Are you excited to dive into video editing but unsure where to start? Have you ever watched a beautifully edited video and thought, “I wish I could create something like that?“ You’re not alone! With so many free video editing software options available today, creating stunning videos’s easier than ever, even if you’re a beginner. In this guide, we’ll take you step-by-step through the basics of video editing using free software. By the end, you’ll feel confident enough to edit your videos like a pro!
Why Choose Free Video Editing Software?
If you’re new to video editing, investing in expensive tools might not be the best option. Here’s why free video editing software is perfect for beginners:
- Cost-Effective: It’s free, so you can experiment without spending a penny.
- Beginner-Friendly: Many free tools are designed with beginners in mind, featuring easy-to-use interfaces.
- Feature-Rich: Despite being free, many of these tools offer powerful features like transitions, filters, and even green-screen effects.
Top Free Video Editing Software for Beginners
Before we dive into how to use video editing software, let’s look at some of the best free options available:
- DaVinci Resolve: Known for its professional-grade features.
- Shotcut: Ideal for straightforward editing needs.
- iMovie (for Mac users): Simple and intuitive.
- OpenShot: Perfect for creating fun and creative projects.
- CapCut: Great for editing videos on the go, especially for social media.
Choose a tool that fits your needs and device compatibility.
Getting Started with Free Video Editing Software
1. Download and Install the Software
The first step is downloading the software from its official website. Make sure to:
- Check your device’s system requirements.
- Avoid downloading from untrusted sources to ensure safety.
Once installed, open the software to familiarize yourself with its interface.
2. Understand the Interface
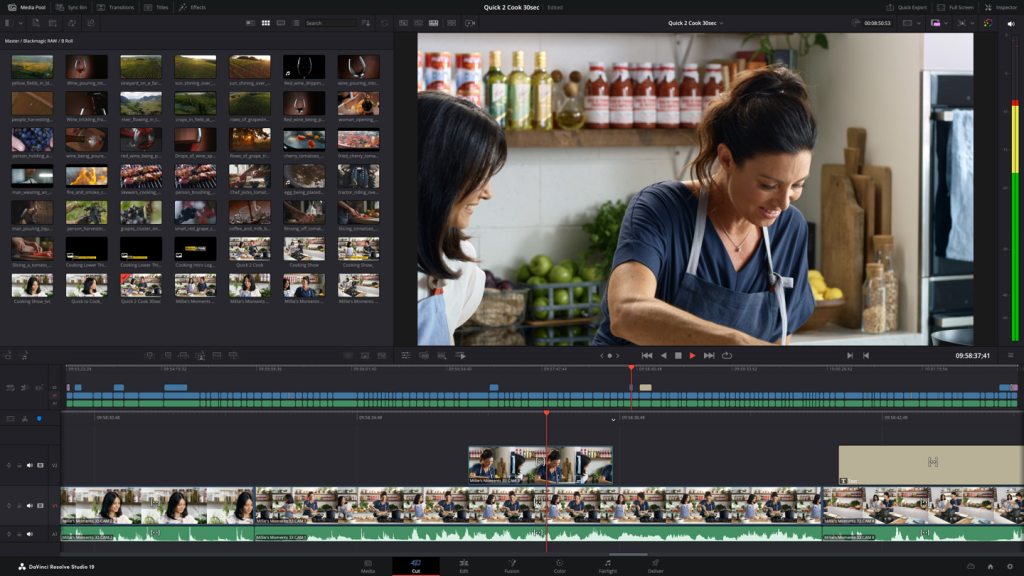
Most video editing software shares a similar layout. Here’s a breakdown:
- Timeline: Where you’ll arrange and edit your clips.
- Media Library: Stores your imported videos, images, and audio files.
- Preview Window: Lets you see your edits in real time.
- Toolbar: Contains essential tools like cut, trim, and transitions.

Spend a few minutes clicking around to get a feel for the workspace.
3. Import Your Media Files
To start editing, import the files you want to work with:
- Locate the “Import” or “Add Media” button.
- Select your video, audio, and image files.
- Drag them onto the timeline.
4. Cutting and Trimming Clips
Cutting is one of the most basic editing tasks. Here’s how:
- Cutting: Use the razor tool to split clips into smaller segments.
- Trimming: Drag the edges of a clip to shorten or lengthen it.
This allows you to remove unnecessary parts and focus on the best content.
5. Adding Transitions and Effects
Want to make your video flow smoothly? Add transitions:
- Go to the “Transitions” menu.
- Drag and drop your desired transition between clips.
- Preview the effect to ensure it looks smooth.
To enhance your video further, experiment with effects like color correction or filters.
6. Adding Text and Titles
Adding text can make your video more informative and engaging:
- Open the “Text” or “Titles” menu.
- Choose from pre-designed templates or create custom text.
- Adjust the font, size, and color to match your video style.
You can use text to add subtitles, captions, or a title screen.

7. Inserting Background Music
A great video isn’t complete without the right background music. Here’s how to add it:
- Import your audio file to the media library.
- Drag it onto the audio timeline.
- Adjust the volume to ensure it doesn’t overpower dialogue or other sounds.
8. Exporting Your Video
After finishing your edits, it’s time to export:
- Click the “Export” or “Render” button.
- Choose your desired resolution and format (e.g., MP4, AVI).
- Save the file to your computer or directly upload it to a platform like YouTube.
Tips for Beginner Video Editors
Here are a few tips to make your editing journey smoother:
- Start Simple: Don’t overwhelm yourself with advanced features at first.
- Use Keyboard Shortcuts: Learn basic shortcuts to speed up editing.
- Watch Tutorials: Many free resources are available to help you learn.
- Practice Regularly: The more you edit, the more confident you’ll become.
- Save Often: Prevent losing your work by saving frequently.
Common Mistakes to Avoid
- Overusing Effects: Too many effects can make your video look cluttered.
- Ignoring Audio Quality: Poor audio can ruin even the best visuals.
- Skipping a Rough Cut: Always start with a rough cut before adding final touches.
- Failing to Plan: Outline your video before editing to save time.
Conclusion
Editing videos doesn’t have to be intimidating, even if you’re just starting out. With free video editing software, you have all the tools you need to create something amazing without spending a dime. By following this beginner-friendly guide, you can master the basics and start crafting videos that stand out.
So, what are you waiting for? Download a free video editor today, and let your creativity flow. Who knows? Your next video might just go viral!
